DogWatch® Troubleshooting Tips
You should be able to locate the solutions to frequently asked concerns concerning DogWatch outdoor concealed fences by using these troubleshooting methods. These guidelines mostly pertain to DogWatch Performance Series devices that make use of our unique, proprietary SafeLink® FM technology.
Please Contact Us if you are unable to locate the information you want here.
Collar for Receiver
- Does the receiver collar’s battery need to be changed?
- The collar may be too loose.
- Does the receiver collar function correctly?
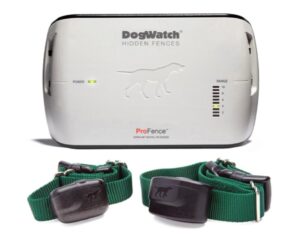
Sender and Boundary Wire
- Is the transmitter operational and turned on?
- Is there a border wire disconnected?
- Is the fence shattered?
- Are the settings on the transmitter correct?
- Is the range of the signal too small?
- The Rate level: Is it too low?
- Is the switch for training mode in the correct position?
Training Pets
Have you and your dog finished the training prescribed by the dealer?
Since your dog received training, has anything changed? Does your dog require further training?
If you need help or have any further questions, please get in touch with us.
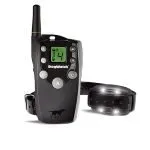
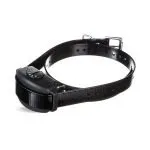
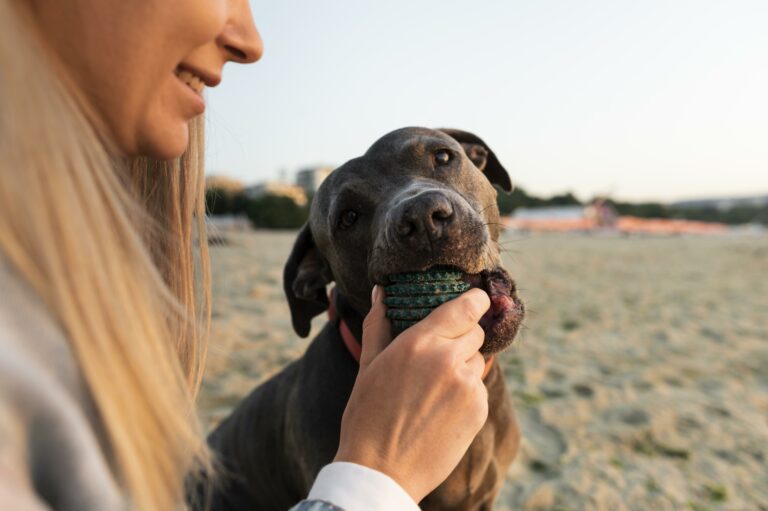
Adjustable Collar
Every R7, R8, and R9 receiver is fitted with a nylon collar that may be adjusted. The collar need to be worn over the dog’s usual one. To ensure that the contact posts of the collar make contact with the dog’s neck skin, it should be adjusted. During the first few days of wearing, make sure the collar fits properly and doesn’t irritate your pet’s neck.
Safelink® FM Radio Signal
The DogWatch receiver can only detect and activate to our specific radio signal thanks to our proprietary FM design. This shields your cat from inadvertent correction brought on by stray radio waves that other electrical equipment could accidentally release.
Automatic Shutdown
In the odd event that your dog is trapped in the signal field, the dog confinement system is meant to shield them from overcorrection. The receiver will automatically cease correcting your dog after 15 seconds if they do not leave the signal field, preventing overcorrection. When the canine exits the signal field, the receiver will automatically reset.
Collar Bone
The receiver is fastened to the nylon collar using the DogWatch® “collar bone” in addition to the metal lock washers and contact pins. Place the flat side of the collar bone against the collar strap for double-ply collars, and the recessed holes of the collar bone against the collar strap for single-ply collars.
Note: Only our stainless steel contact posts should be used with the collar bone. Our GentleFitTM contact posts do not utilise it.
Contact Posts
There are two sets of stainless steel contact posts (long and short) included with the receiver. Based on your dog’s coat type, skin sensitivity, and neck shape, your DogWatch Dealer will choose the appropriate set. For the dog to sense the reprimand, the posts need to come into touch with its skin. In some situations, your dealer could advise shaving a little bit of hair around the contact posts to make it easier for them to come into contact with skin. If you must use the collar wrench to tighten the contact posts, do with caution as excessive force might harm the receiver.
Additionally, we provide our unique GentleFitTM contact posts. They function exactly like our stainless steel posts, but they connect to the collar and receiver as one unit, and their low-profile design makes them quite comfortable to wear. Posts by GentleFitTM are particularly beneficial for cats, little animals, and pets with short hair. If GentleFitTM contact posts are the correct fit for your pet, ask your local dealer.
Antenna
The omni-directional antenna design of the receiver ensures the best possible reception from the signal field.
Status Light
In addition to monitoring your receiver constantly, the status light offers the following functions:
Start-Up
The status light on your receiver will blink red and green the first time the battery is inserted. This shows that the receiver has powered up successfully. After it is turned on, the status light will keep flashing green to show that everything is operating OK, roughly every 30 seconds. If the light does not flash, make sure the battery is correctly placed by checking its insertion.
Training Level Indicator
Your receiver’s status light will flash green and make loud beeps while you programme the training level. The quantity of flashes will match the selected training level.
Signal Field Indicator
The status light will flash green when the receiver is in the audible zone and red and green when it is in the correction zone while it is being tested in the signal field.
Correction Alert
The status light will indicate whether your pet has pushed the boundaries. Following the dog’s entry into the border region, the status light will double flash green every 30 seconds for the duration of the 24-hour period.
Battery Indicator
This function keeps an eye on the battery’s voltage. The status light will alternate every ten seconds between blinking “red” and regular “green” after the receiver determines that the battery has dropped below a certain voltage. This suggests that your battery needs to be changed within the next three to four days because it is almost at the end of its functional life.
Your pet has challenged the dog containment system if your light flashes twice red, which is an indication that your battery is low.
FastReact®
The quickest standard reaction time offered by a pet containment fence receiver is provided by the DogWatch R7, R8, and R9 receivers. Regardless of how your dog enters the Avoidance Zone—strolling, running, or sprinting—the DogWatch receiver will respond and adjust in less than.125 (1/8) seconds.
User Programmable Feature
You may tailor the receiver to one of 20 training settings by combining the transmitter “Rate” and the receiver training levels. For instance, your dog is getting the least amount of correction and the fewest pulses per second if the receiver and transmitter rate are both set to Level 1.
IMPORTANT!
Don’t put your dog’s receiver collar next to or on top of a television when you take it off at night. Please refer to the battery package’s handling guidelines.
The R7mini Battery
A 3 volt 1/3 N lithium battery powers both the R7mini and the full size R7 radio. The receiver’s battery life is intended to last six months. The battery’s negative (-) end has to be put downward.
Battery for R8, R9, and SmartCollar
The 3.6 volt lithium battery powers the R8, R9, and SmartCollar radios. The receiver is built to last up to two years on a single charge. The battery’s positive (+) end has to be put downward.
The receiver is attached to the dog’s neck collar and is programmed to detect a particular coded FM radio signal coming from the boundary wire. If the dog gets too close to the boundary wire, it will sound an alert and then “correct” it. It has a removable battery that powers it, and when the battery lid is tightened, it becomes waterproof.
Restarting The Battery Condition Indicator
- Take out the old battery.
- Prior to putting the new battery in, wait five minutes.
The Battery Status Light can be reset by waiting five minutes following the removal of the previous battery. For a whole day, the Battery Status Light will flicker red if you don’t wait to put the new battery. It will reset itself automatically after a full day.
Inserting a New Battery
* Batteries for R7/R7mini: the negative (-) end needs to be placed downward.
*Batteries for R8, R9, and SmartCollar: the positive (+) end has to be inserted downward.
Battery R7
A 3 volt 1/3 N lithium battery powers both the R7mini and the full size R7 radio. The receiver’s battery life is intended to last six months. The battery’s negative (-) end has to be put downward.
R8, R9 & SmartCollar Batteries
The 3.6 volt lithium battery powers the R8, R9, and SmartCollar radios. These receivers are meant to have a two-year battery life. The battery’s positive (+) end has to be put downward.
IMPORTANT!
Don’t put your dog’s receiver collar next to or on top of a television when you take it off at night. Please refer to the battery package’s handling guidelines.
The status light in the R7/R7mini, R8, R9 and SmartCollar receivers provides the following features:
Start-Up
The status light on your receiver will blink green the first time the battery is inserted. This shows that the receiver has powered up successfully. If the lights are not flashing, make sure the battery is correctly installed by checking its status.
Correction Level Indicator
When you programme your receiver’s correction level, the number of times the green status light flashes in tandem with the auditory beeps corresponds to the correction level you have selected.
Field Signal Indicator
The status light will flash green when the receiver is in the audible zone and red and green when it is in the correction zone while it is being tested in the signal field.
Reminder to Change Your Batteries
Before the battery runs out of life, the status light will advise you to change the battery about every ten seconds. Make sure to replace your battery every two years (for R8, R9, and SmartCollar models) or every six months (for R7 models).
IMPORTANT!
It’s important to wait five minutes after removing the old battery before inserting the new one when changing batteries. The status light will go off as a result. The battery status indicator will flicker red for 24 hours after the new battery is placed if you don’t wait.
The degree of training will be started by your Dogwatch Dealer based on the characteristics and nature of your dog. Hold your test light magnet up to the training level adjustment point on the receiver’s side if you need to alter the training level. The current training level will be indicated by a sequence of beeps that you will hear if you hold the magnet steady.
Boundary flags have been positioned around the edge of your yard by your DogWatch Dealer, who has also fitted your dog confinement system and adjusted the transmitter and receiver to training levels suitable for your dog’s characteristics and behaviour. Your dog’s first day of confinement training has already started, according to your dealer. It’s your turn to carry on with the instruction now.
Make sure your dog wears the DogWatch receiver collar around their neck before you start training them with the confinement system.
- The dog’s collar has to fit tightly around its neck. This is really, really crucial!
- The contact post and the dog’s neck should be separated by no more than a thumb’s breadth.
- Since the dog’s neck is at its shortest while facing down (in the sniffing posture), this is the best angle to verify the collar’s snugness.
- When the dog moves his head, the receiver unit will protrude to the side if the collar is too tight.
- When a dog walks into the Avoidance Zone, a collar that is too slack will not provide the desired reprimand.
- Don’t forget to often examine the dog’s neck area for inflammation.
- It is highly recommended by DogWatch to take off the collar every day and when the dog is inside the home.
As necessary, adjust the collar. Recall that collar fit is important! Make sure the collar fits snugly enough to maintain adequate skin contact between the posts and the dog. A finger’s breadth should be the maximum distance between the contact posts and the dog’s neck while ensuring the collar is secure. The dog’s neck is at its shortest when it is down, sniffing. Make sure this is the case.
Your dog’s fur may be thicker in the winter, so you might need to cut it under the collar to make sure it gets the message. You might need to regularly clip your dog’s fur if they have a thick coat. For canines with thick coats in particular, longer contact posts are offered.
It’s likely that your dog has grown and may require a larger collar if they were taught with the DogWatch pet containment fence when they were still a puppy.
On the right side of the transmitter is where the range adjustment dial is situated. The signal’s range from the boundary wire may change based on the dimensions of your property and the requirements of your dog. The range has been customised by your dealer to best fit your dog and yard.
Recognise that your dog confinement system’s signal range is quite sensitive. You should not alter this option unless your dealer advises you to since doing so can seriously reduce the boundary loop’s efficacy.
Make sure you only make little clockwise rotations on the dial while increasing the signal field. Recall that the dog’s safety zone inside the subterranean dog fence shrinks as the signal range increases.
If you decrease the signal range, be sure to turn the dial counterclockwise in small increments.
Make careful to slowly move the dial anticlockwise if you reduce the signal range
Before you undertake any landscaping, designate your yard with the training flags. With the receiver collar on, you can find the location of your subterranean dog fence wire. As you approach the boundary wire, keep the receiver at the dog’s neck height, avoiding the contact posts. Place a flag there as soon as you hear the audible tone. Proceed in the same manner, but from the other side of the hidden wire. The distance between the two flags should be around halfway along the wire.
Don’t forget to take off the collar at night. If your dog stays outside, take off the collar from time to time to see if your dog is irritated.
- Before using your dog containment device or starting training, please read all of the material that came with it.
- Never try to rush your dog’s whole training process.
- The goal of the dog confinement system is to keep domestic dogs within their designated boundaries. Use for any other reason is at the risk of the system owner.
- Should you need service for your system, please get in touch with your nearby Authorised DogWatch Dealer. If you try to fix the equipment yourself, the warranty can be void.
- For dogs four to six months of age or older, the dog confinement system is advised. If a puppy is less than six months, your dealer will advise if it is ready.
- Make sure kids can’t reach the transmitter or the collar.
- When your dog is wearing the collar, never make adjustments to the transmitter or receiver.
- When your transmitter is not in use for an extended period of time, or during a lightning storm, DogWatch advises you to unplug it from the wall socket and detach the loop wire. By doing this, harm from powerline surges and lightning will be avoided.
- Only domestic dogs who have received training are supposed to use this product. If your dog is violent or aggressive and could hurt itself or people outside the gated area, you need take further precautions to keep them under control.
In the event that your system isn’t functioning, be sure to inspect the contact posts and tighten the receiver’s battery cap. Additionally, examine the transmitter’s lights.
The transmitter’s red light indicates that your dog confinement system is powered by AC power, and the green light indicates that there are no wire breakage.
The Rate of “1” will cause the green loop light to flicker rapidly. The green loop light will blink gradually when the Rate is set to”2,” and it will remain steady and cease to blink when the Rate is set to “3.”
The green light will go out and there will be a noticeable chirping sound if there is a wire break.
Your AM transmitter may have had a lightning surge if both the loop and power lights go out.
Reset the GFI outlet if your transmitter is hooked into one to make it work.
Get help from your Dealer if you’re still having issues with any of DogWatch’s wireless or subterranean fences.